Showing posts with label upcycled. Show all posts

project(s) update: piano key sunburst mirror

9.24.2013

Remember my sneak peeks of projects in the works? (CLICK HERE if you've forgotten.) That pile of 60+ year old piano keys ....


... a sunburst mirror!


 I hemmed and hawed for months about how to attach the keys and finally just tried to glue (wood glue) them. And ... it didn't work so well, so I ended up just nailing them straight through with 1-1/4" nails. I may go back and add a third nail to each key, but I was finished for the day and wanted to see how it would look.


 Kind of amazing! At least this one (if not two) will be for sale at the Market - coming up October 25 26th. And if they don't sell, I'm putting it right back up on the wall here. It's sorta retro, sorta artsy. I love it!

(and did you know? each piano key is numbered ... I used numbers 1-22 on this one)

a DIY square pallet wood planter

6.26.2013

Did you notice the pretty planter on my cart makeover yesterday?

I originally wanted to mount a wood planter on the kitchen (the room with the most sun = where plants don't die) wall to save some table space, but after it was all said and done, it was too big and awkward to put on the wall. Anywhere. Boo.

Lesson learned. However, this was a big disappointment, especially how much blood, sweat and tears went into this project. Read on for that story because making this planter is actually quite simple.


How to turn this....

into THIS!


What to do: I had gathered some pallet scraps to take to my dad's house so he could help me whip up this planter really quickly. We measured it so the inside was 7-1/4" wide so the plastic insert would fit right into it. Then we ripped (cut longways) several different pieces at different widths to get a staggered (handmade and imperfect) look. Using the air compressor, we nailed up the sides. Then we cut a very thin piece of board to fit the bottom and nailed it on too. Later, I took it home and sanded it down, then stained it.

What not to do: The way to turn this project into a blood, sweat and tears project is to ignore that your dad doesn't have his blade guard on the table saw and watch in horror as he accidentally slices his finger on the blade. Yes, blood, 6 stitches and all.

Oh, and the tears were mine.

To add to the drama, he is extremely squeamish when it comes to blood, especially his own, so he's basically fainting on the floor while we try to see if his finger is gone. You can imagine all of the scary feelings running through my head as I scream for my mom to come help. All for a dumb project that didn't even turn out to go on the wall.

Oh well, it's finished. Thanks for your help and sacrifice for my silly ideas, Dad.

:-)

little handsome man - onesie vest and bowtie diy

4.23.2013

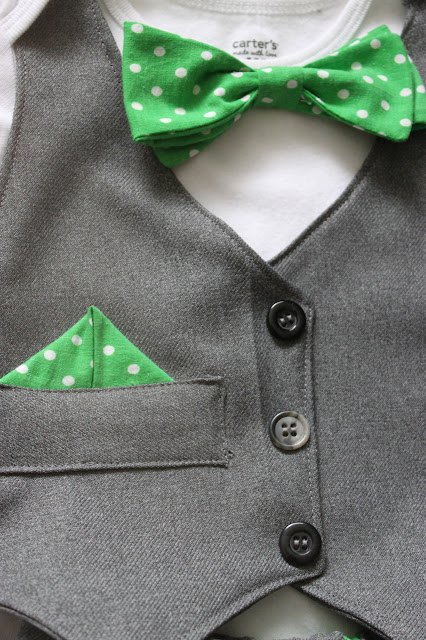
Lately I've been honing my sewing skills by upcycling an old pair of my dad's dress pants into a cute little size 18 month onesie vest and bowtie complete with little shorts! My nephew needed something to wear to a family wedding, and my sister found THIS inspiration. I offered to try. And it worked!


There was no tutorial, but I pretty much copied it exactly from the picture... with a green polka dot bowtie and pocket square and three buttons instead of two. But pretty much the same.


I drew out my own rough pattern on old packing paper so I'd at least get both sides of the vest symmetrical - and the rest came together so quickly! I found a thrifted napkin (seen here) that would work perfectly and hoped that polka dots wouldn't be too feminine.

Um, how baby manly can you get?! :-)


Then I tried my hand at little shorts - mostly using Dana's pant tutorial and a pair of Ladybug's old jeans. I used the old waistband from the pants and had a few trial and error/imperfections to work out, but on the whole I'm pleased. My favorite parts are the little faux front pockets and the little coordinating fabric in the back.

front:
back:


Now we just have to wait and see if they fit this little guy for his uncle's wedding. I'll update and get pictures of it on this sweet guy after the wedding in June!

Update: With the exception of rolling up the shorts, it fit! See it on him HERE

commissioned: backpack hanger

1.17.2013

I had a commission request from a good friend's husband and decided to share it with you! It's one of my favorite pieces from the fall - the patina is LOVELY and completely authentic. Not one ounce of fake distressing - although I do love myself some good faux distressing.

Remember the old chippy barn door from this pic?


My FIL helped saw off the top (the above is going to be made into a queen size headboard. Next year's Market maybe?) so I had this piece laying around.

As soon as he proposed the project I thought this would be the perfect piece for her backpack hanger.

The three faux antiqued "door knobs" came from the hobby store purchased for me ... so all I had to do was attach, right?

Not so fast.


First, the door piece fell apart at the joints. It wasn't glued just jointed together, so when we cut it apart ... yikes! So I glued it together with wood glue and hoped it would stay. It sturdied it right up. 


The knobs only had one screw hanger on the back, so hanging backpacks on it day in and day out wasn't feasible unless they were better fastened to the board.

I whipped out my trusty internet search engine and found that only a 2-part epoxy would work. I got some JB Weld original epoxy and mixed that baby up. It worked like a charm and is still holding (as far as I know).

However, I'd use gloves next time. What was I thinking anyway? I got the tiniest smear on my hand and my mouth tasted like metal for a few hours. Yikes! Not the healthiest stuff to be touching. Or using for that matter.


Finally, I attached a cleat to the back because it was HEAVY - and backpacks would make it even heavier! - and I wanted it to hold up.

Maybe I can snag a picture of it hung up. I'll update if I do.

I love it. What do you think? 

the weekend Market

10.29.2012

After a crazy day last Thursday (complete with rain and 3 hours at the pediatrician/x-ray lab/pharmacy for Ladybug), I finally got to my space at the Market at set up.

Oh, did I mention I got the spot right by the door? Chilly but SOOOO worth it! I sold more than I was hoping for!

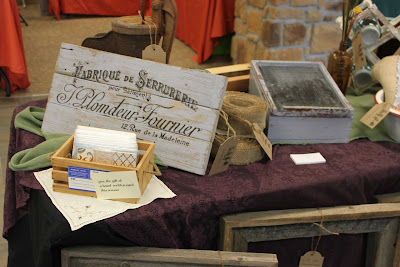
I would've planned differently if I would've know how big my space was (bigger than the allotted 9'x9' I paid for!) but I made do with what I had. I arranged it so people might very well want to walk right through the center of my booth. And, they did. Some also got confused if one of the tables was my stuff, but I assured them it was.

Some kiddos walked a little too close to some of the signs on the floor and knocked a few over, but I made sure nothing super precious was down there. That's the good thing about rustic and distressed ... a little bit of kid or klutzy adult (a.k.a. me) won't hurt a thing. It'll just add to the charm.

my spot at the Market (main entrance to the right of the pic)
(sorry, Sharla, Jeremy didn't tell me that my collar was curled up!)

Christmas wreath plaques and barnwood frames


table runners

my clocks were the first to go!


this one didn't sell, so it's staying in the family. :-)

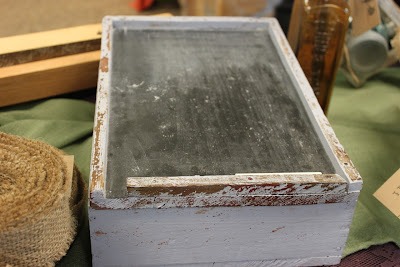
handmade lumberyard receipt box from the 1940s...

...turned chalkboard message center. (Didn't sell either but I love it!)

My mason jars looked super cute but only sold 1. Out of 30. Oops.

German bakery sign!

isn't the mint green ricer so cute?

love this old kitchen scale

signs and hangers (and pearls)

paper wreaths went over well too! Made 6, sold 4.
Overall, the Market was a great experience. I was surprised that my cards and lavender sachets got a lot of thumbing through but no takers ... and my signs in French and German weren't taken until later the 2nd day! But just because I love something doesn't mean someone else will.

I got lots of compliments from friends and strangers, so that made me feel good, of course. I was already pleased with the set-up job and my work, so the compliments and my spot sealed the deal! Thanks to everyone who came, who bought, encouraged me through the process, helped with the projects, gave me ideas ... for all of your support! I couldn't have done it without you all. Seriously.

(And, in case you are wondering, I wore the thrifted striped gray and blue shirt dress the first day and my vintage navy polka dot dress the next. I loved that I had something to dress up for... )

Market Sneak Peeks!

10.22.2012

Finally, I dragged several Market items upstairs to photograph. I snapped these quickly, so please don't judge the photograph quality. I'll get some better photos once I have everything set up this weekend ... especially for those who can't come see it in person. (But I wish you all could!)

Everything has at least one element of vintage, upcycled, recycled or reused material. (Well, everything except my cards, but I made an exception to see if they would sell.) 

I have a few clocks.


 And lots of handpainted signs.


Pretty hangers.


French (and German!) signs.


Linen lavender sachels with pretty vintage buttons.


And a few holiday items, of course.


Come if you can!! I have lots more.

This Friday and Saturday. More info here.

More Christmas Market Upcycles

9.13.2012

A few random home decor pieces that will go in my market booth...

Loved this 70s print found at a garage sale for $1. Hated the frame.


My original idea was to disassemble the frame and just reframe the butterflies in a modern oval shaped frame. (Still looking for that frame! Any ideas?)


Then I got to thinking that I should try painting the frame and using it too! (Duh!) So I painted it with black acrylic and used the heavy cardboard backing to decoupage some old sheet music to. Here's a peek:


A couple of grapevine wreathes I thrifted are going to be a sweet and simple little decor piece with white flowers and burlap "ribbon" strings.


Then I've upcycled some coffee bags into coasters. Definitely for the pretty factor, not for waterproof coaster protection. :-) I weaved in some vintage sewing notions for some fun, color and personality.


Finally, I'm using some vintage fabric (from my Grandma's stash) to make table runners. I love ruffles!


And I spent a couple hours (mostly in front of Project Runway) in several different stages, cutting and punching out these recycled cardboard tags. Lemme tell ya, my hands HURT after I was done!

But I love 'em. And I got 110 for only about $6! (Plus the stamps are reusable.)


Tell me what you think! Any other ideas just popping out that you have to share?! I'm open!